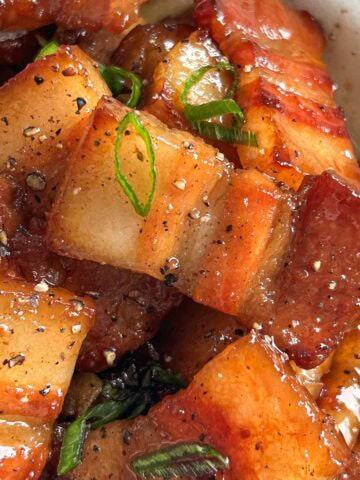
Juicy, crispy pork belly that was only served during special occasions became a regular weeknight meal in my family thanks to a couple easy techniques! This crispy pork belly recipe comes together in under 1 hour and doesn't require any overnight drying to get that crispy pork belly skin! It's made with just a handful of ingredients and it's so easy, you'll wonder why you didn't make it sooner.
Growing up in a Vietnamese household, we referred to this dish as thịt heo quay! When thịt heo quay (crispy pork belly) started becoming more expensive while the quality was simultaneously going downhill, my dad decided he was going to teach himself how to make it so he could make it better and for cheaper, at home.
If there's one thing you should know about my dad, it's that he loves saving money but also loves being able to do things with his own hands! This crispy pork belly recipe uses his tried and true techniques that get that crispy pork belly skin!
My parents would tag team this dish all the time growing up. My dad would make the crispy pork belly and my mom would make the banh hoi, nuoc mam cham, and herb and veggie platter for us to enjoy it with! It's my favorite Vietnamese dish and I hope you'll love it too!
What is crispy pork belly?
Crispy pork belly is called different things in different cultures! It's lechon in the Philippines, chicharrón in Spain and Latin America, siu yuk in Cantonese, but in my Vietnamese family, as know it as thịt heo quay!
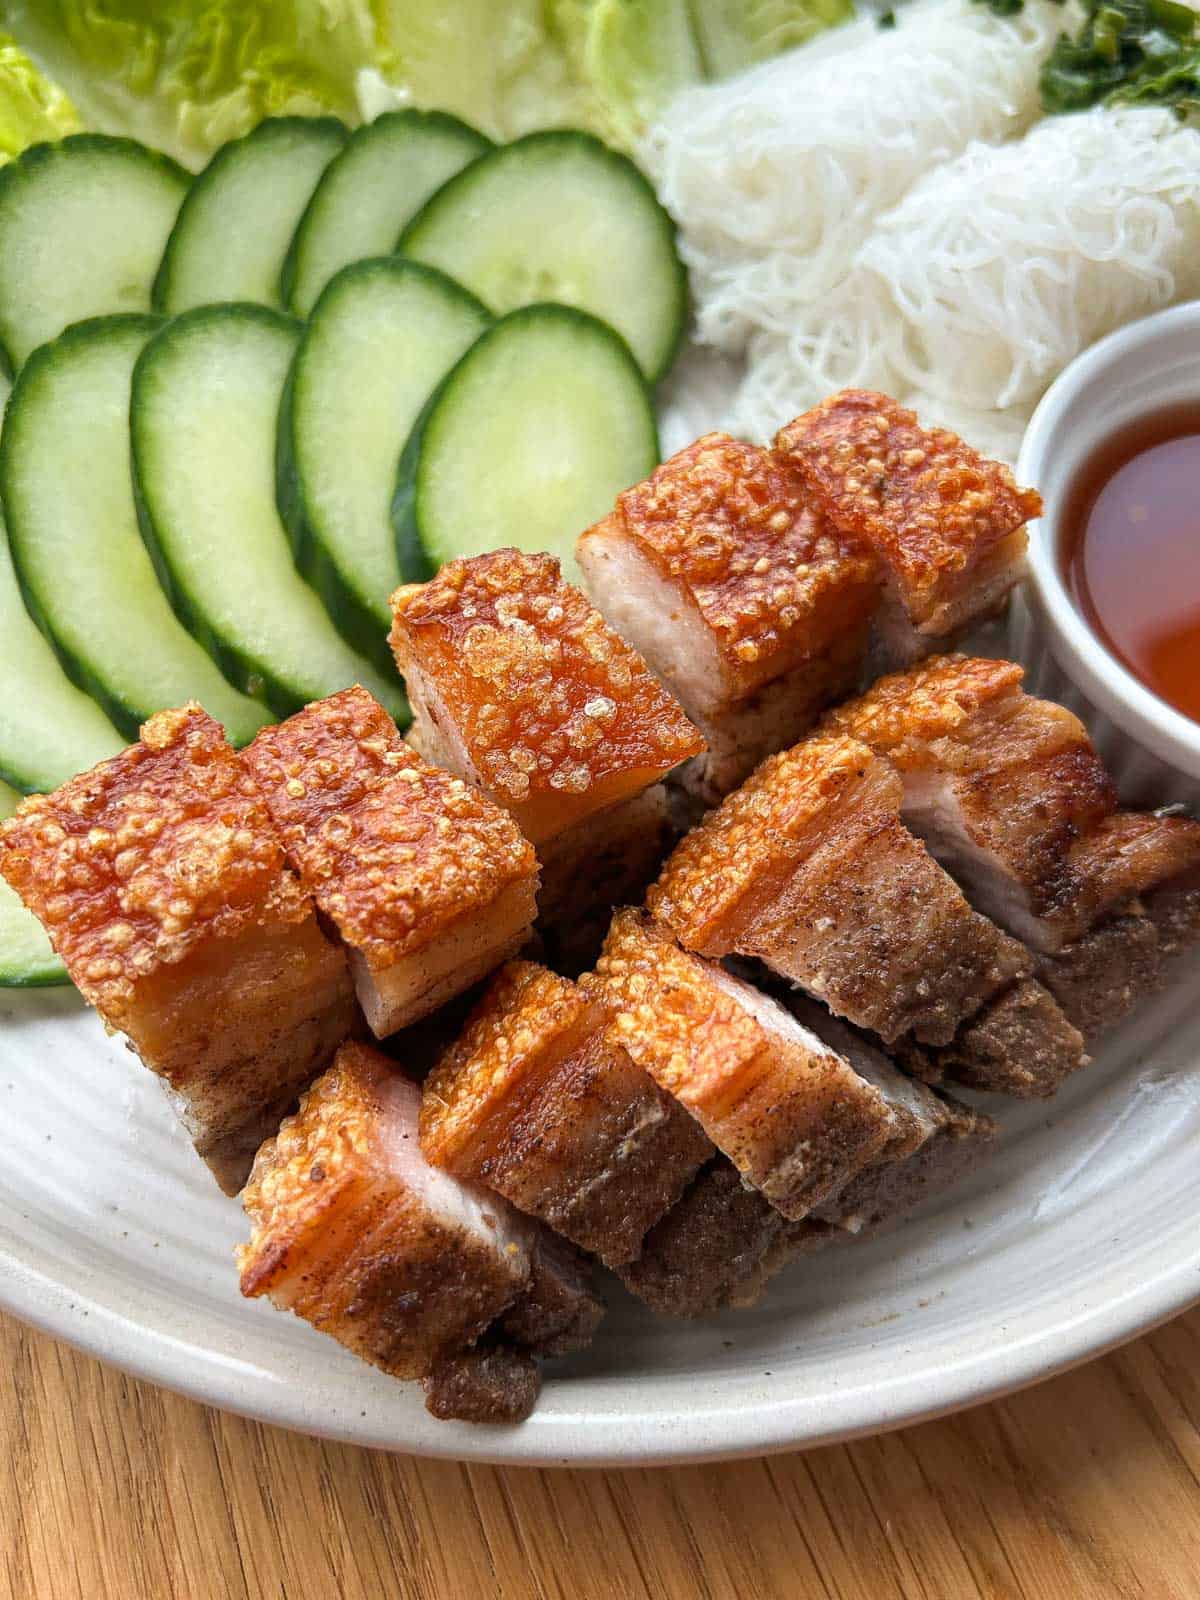
No matter which culture you're referring to, it's usually a slab of pork belly (the same part of the pig that bacon comes from) with the skin on that has been dried and fried (or air fried) until crispy. It's juicy, crispy and so irresistible! Pair it with some nuoc cham and banh hoi and you'll get a sweet, salty, and slightly spicy combination that makes you understand why this is my favorite Vietnamese dish.
Why you'll love this crispy pork belly recipe
- Comes together in under 1 hour!
- Uses a handful of ingredients, including some pantry staples.
- Irresistibly crispy and will have you coming back for more!
- No deep fryer required. It's made crispy in the air fryer with a couple simple techniques.
The best technique to getting crispy pork belly
- Parboil it - Parboil the meat side of the pork to remove impurities, while keeping the skin dry. This step while optional, creates a cleaner pork taste.
- Prick it - Creating small punctures in the skin will allow the fat to render out and puff up to create that crispy pork skin.
- Dry it - Vinegar and salt both work together to dry out the skin even further, which helps to create that crunchy skin.
- Oil it - Adding a little oil back into the dried skin helps "fry" the skin to get the crackly and crunchy texture we're looking for.
Jump to:
- What is crispy pork belly?
- Why you'll love this crispy pork belly recipe
- The best technique to getting crispy pork belly
- Ingredients
- How to make crispy pork belly (air fryer)
- Top Tips for the Best Crispy Pork Belly
- How to store and reheat crispy pork belly
- What to serve with crispy pork belly
- FAQ
- Other recipes to try:
- Crispy Pork Belly (Air Fryer Method)
Ingredients
- Pork belly, skin on: Must get pork belly with skin on. This recipe will not turn out well if you do not use skin on pork belly. This can be found at Asian grocery stores like HMart and 99 Ranch.
- Five spice powder: The classic flavor profile to crispy pork belly!
- Salt: To season the pork and creating the salt crust that further dries out the skin.
- Shaoxing wine: Helps to tenderize the meat, while adding depth and subtle sweetness.
- White vinegar: Lightly breaks down and dries out the skin.
- Neutral oil: Helps "fry" the skin evenly. Use a high smoke point oil here.
See recipe card for quantities.
How to make crispy pork belly (air fryer)
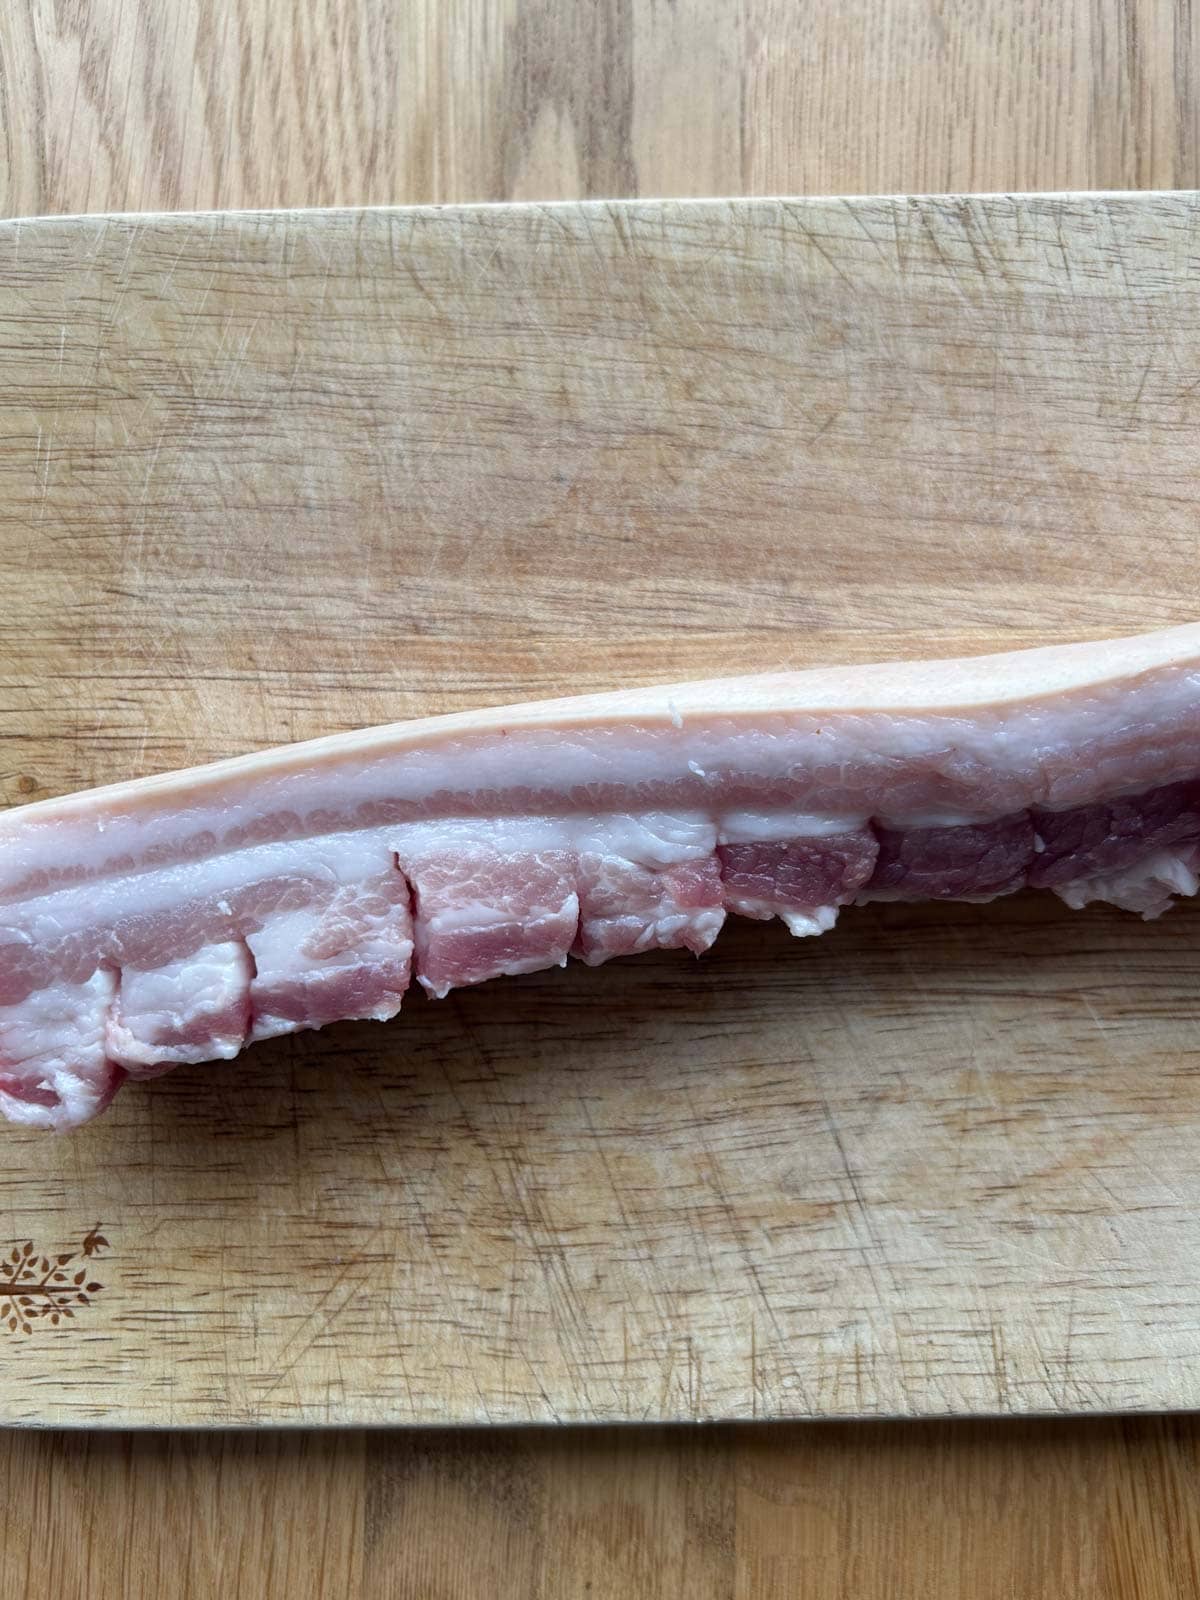
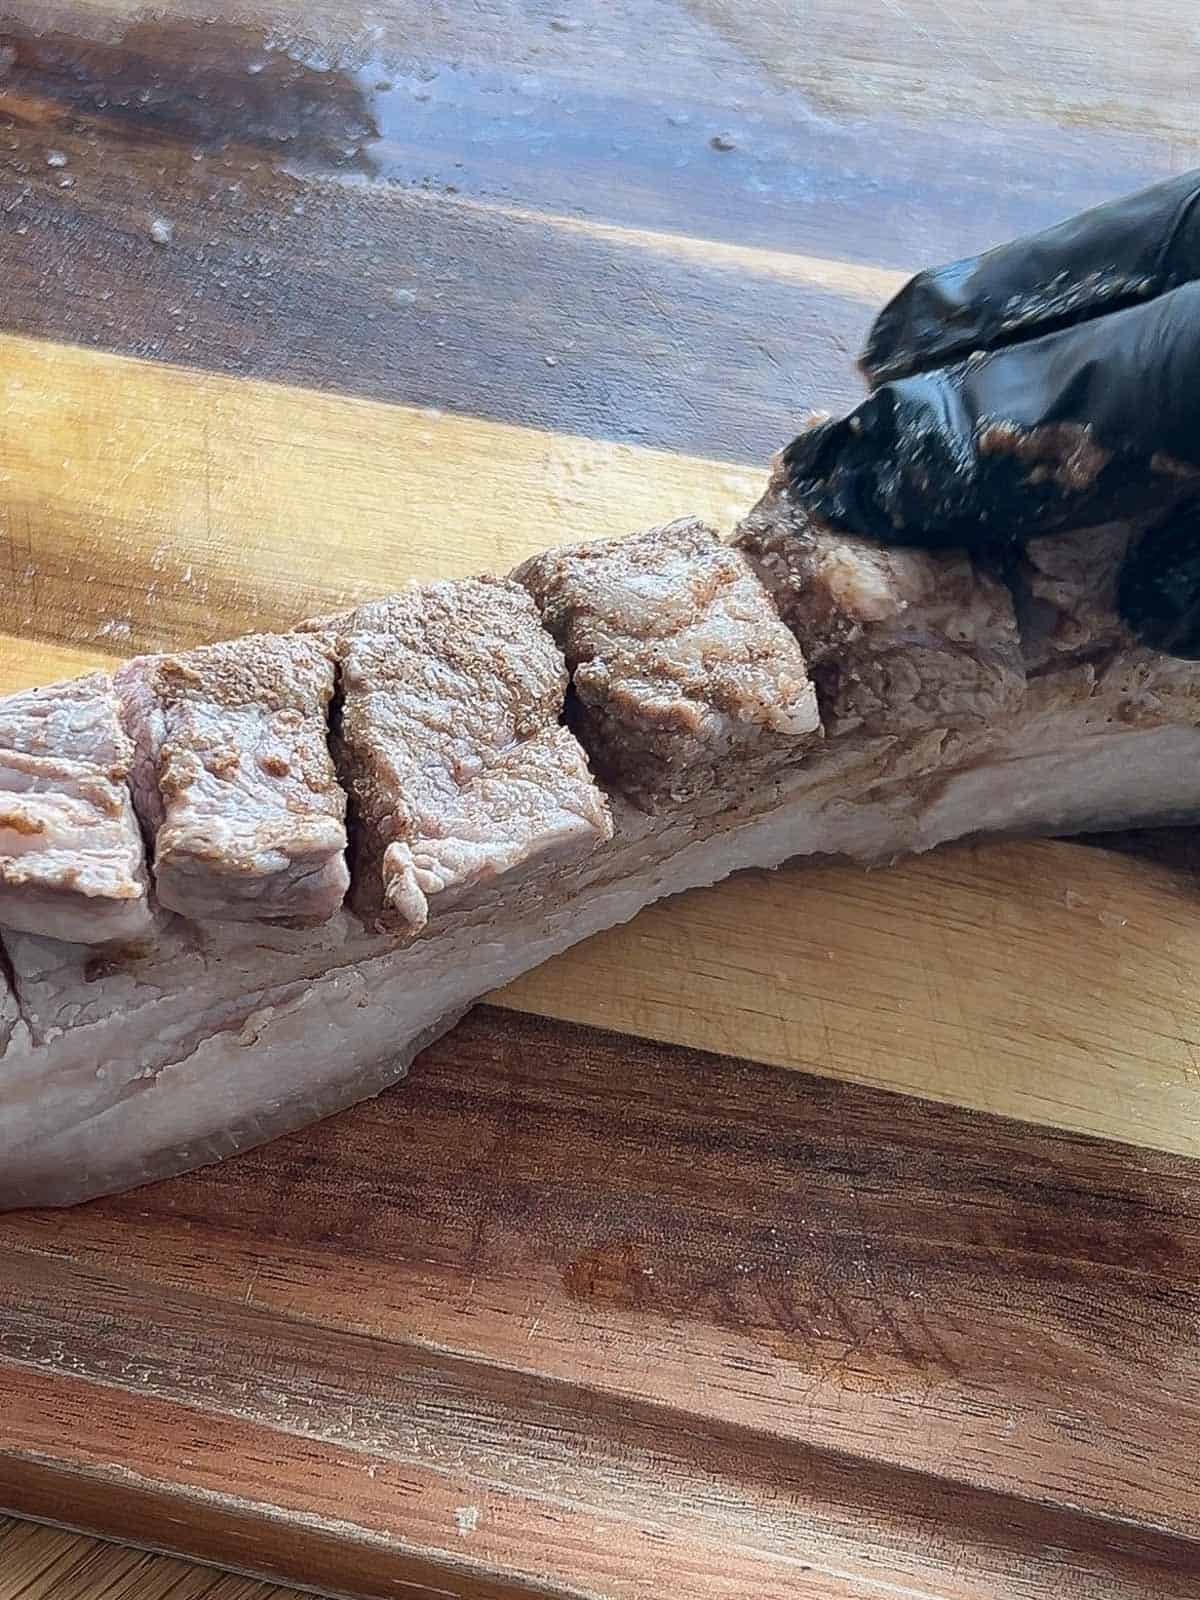
- Step 1: Using a sharp knife, cut 1 inch slits halfway into the meat side of the pork belly. This helps the marinade penetrate deeper.
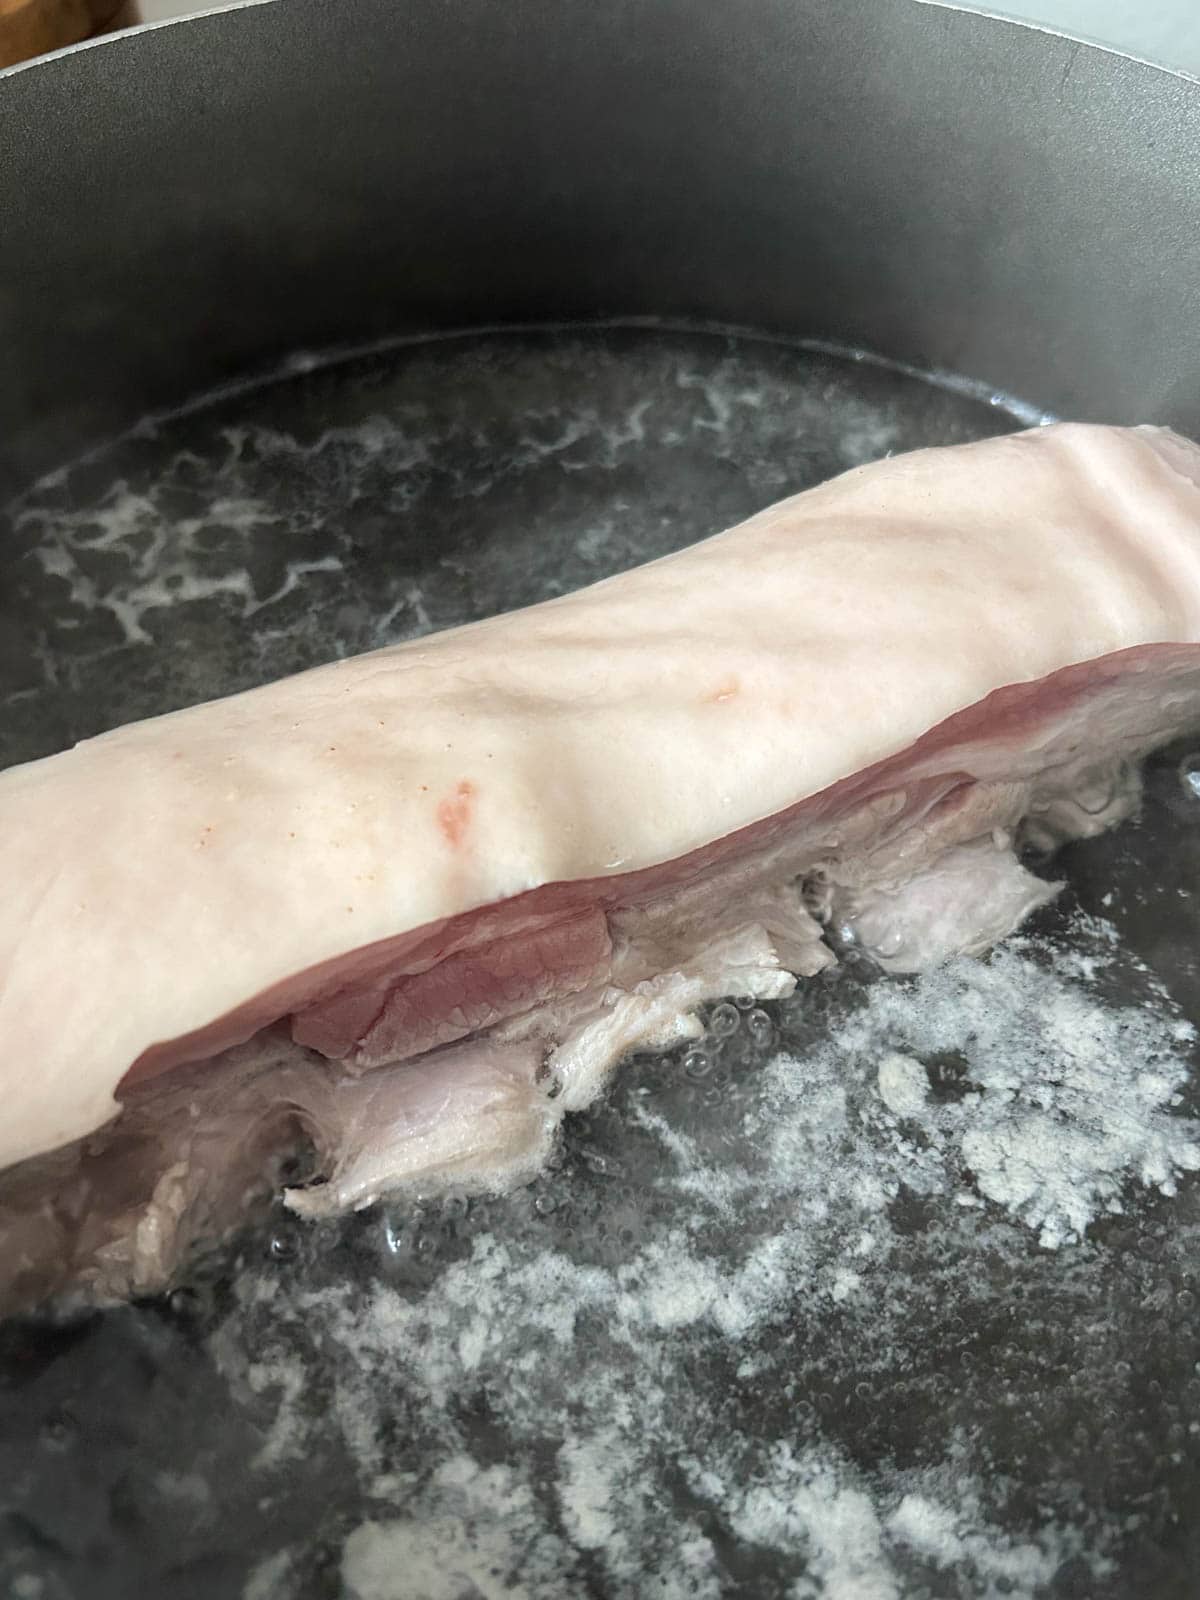
- Step 2: Parboil the pork belly by adding 1 inch of water to a pot and bringing it to a boil. Add in the pork belly, meat side down, making sure the pork belly skin sits above the water and remains dry. Parboil for 5 minutes to draw out impurities. After 5 minutes, remove the pork belly and pat it dry.
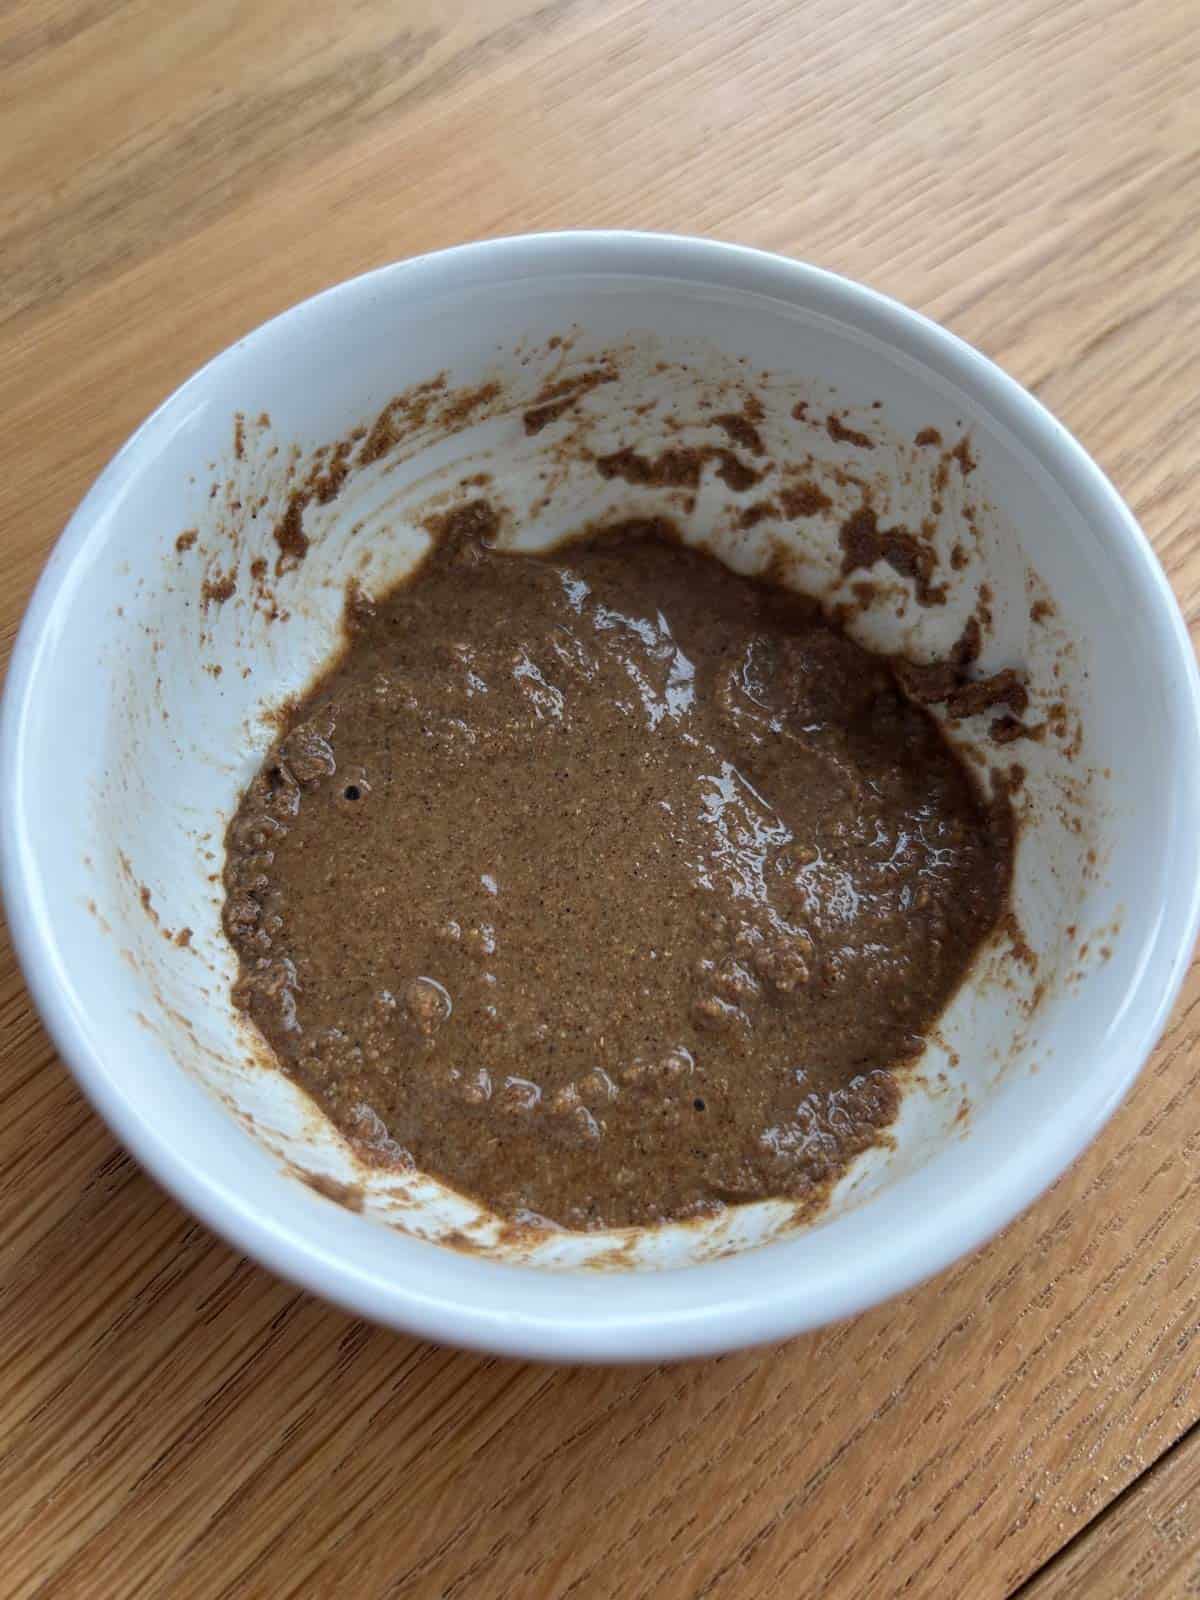
- Step 3: Mix together five spice powder, ½ teaspoon salt, white pepper, and Shaoxing wine until it forms a paste. It'll be thick and fragrant. Set aside.
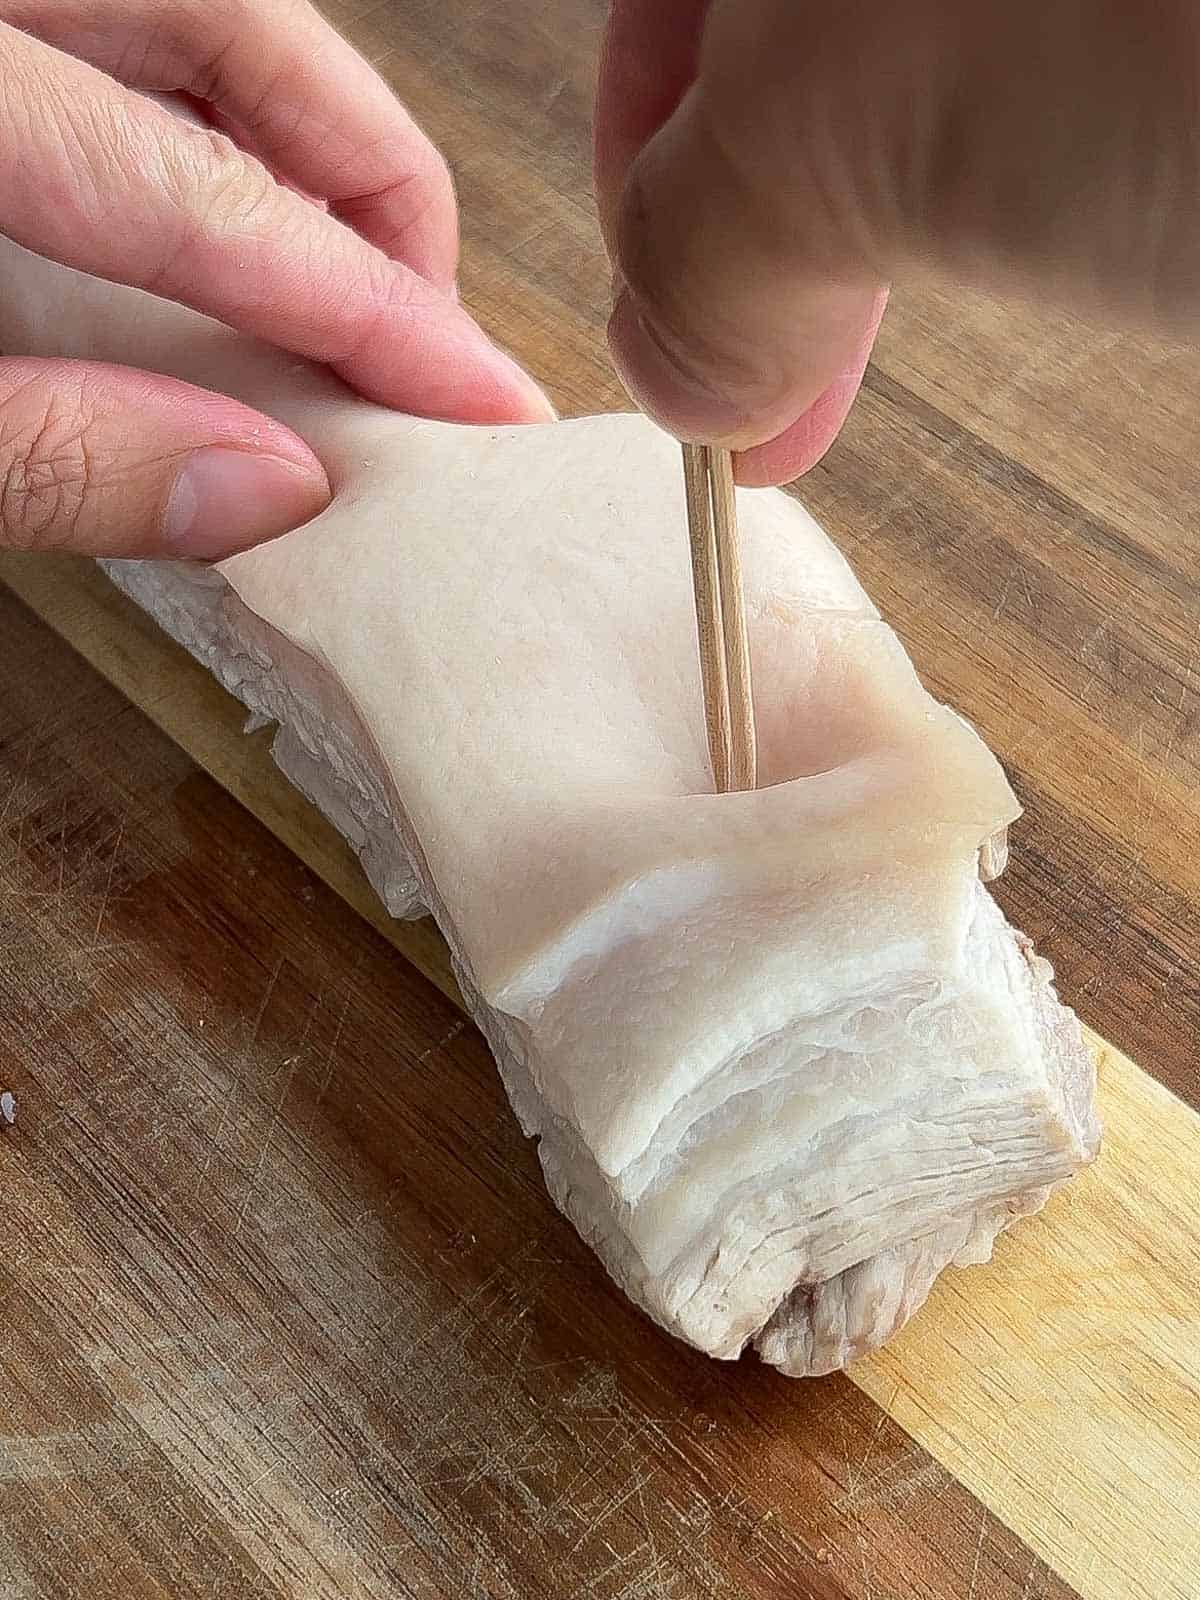
- Step 4: Using a toothpick, fork, or meat tenderizer, prick small punctures into the pork skin, being careful not to puncture deeper than the skin.
- Step 5: Rub the five spice paste all over the meat side only, working it into the slits.
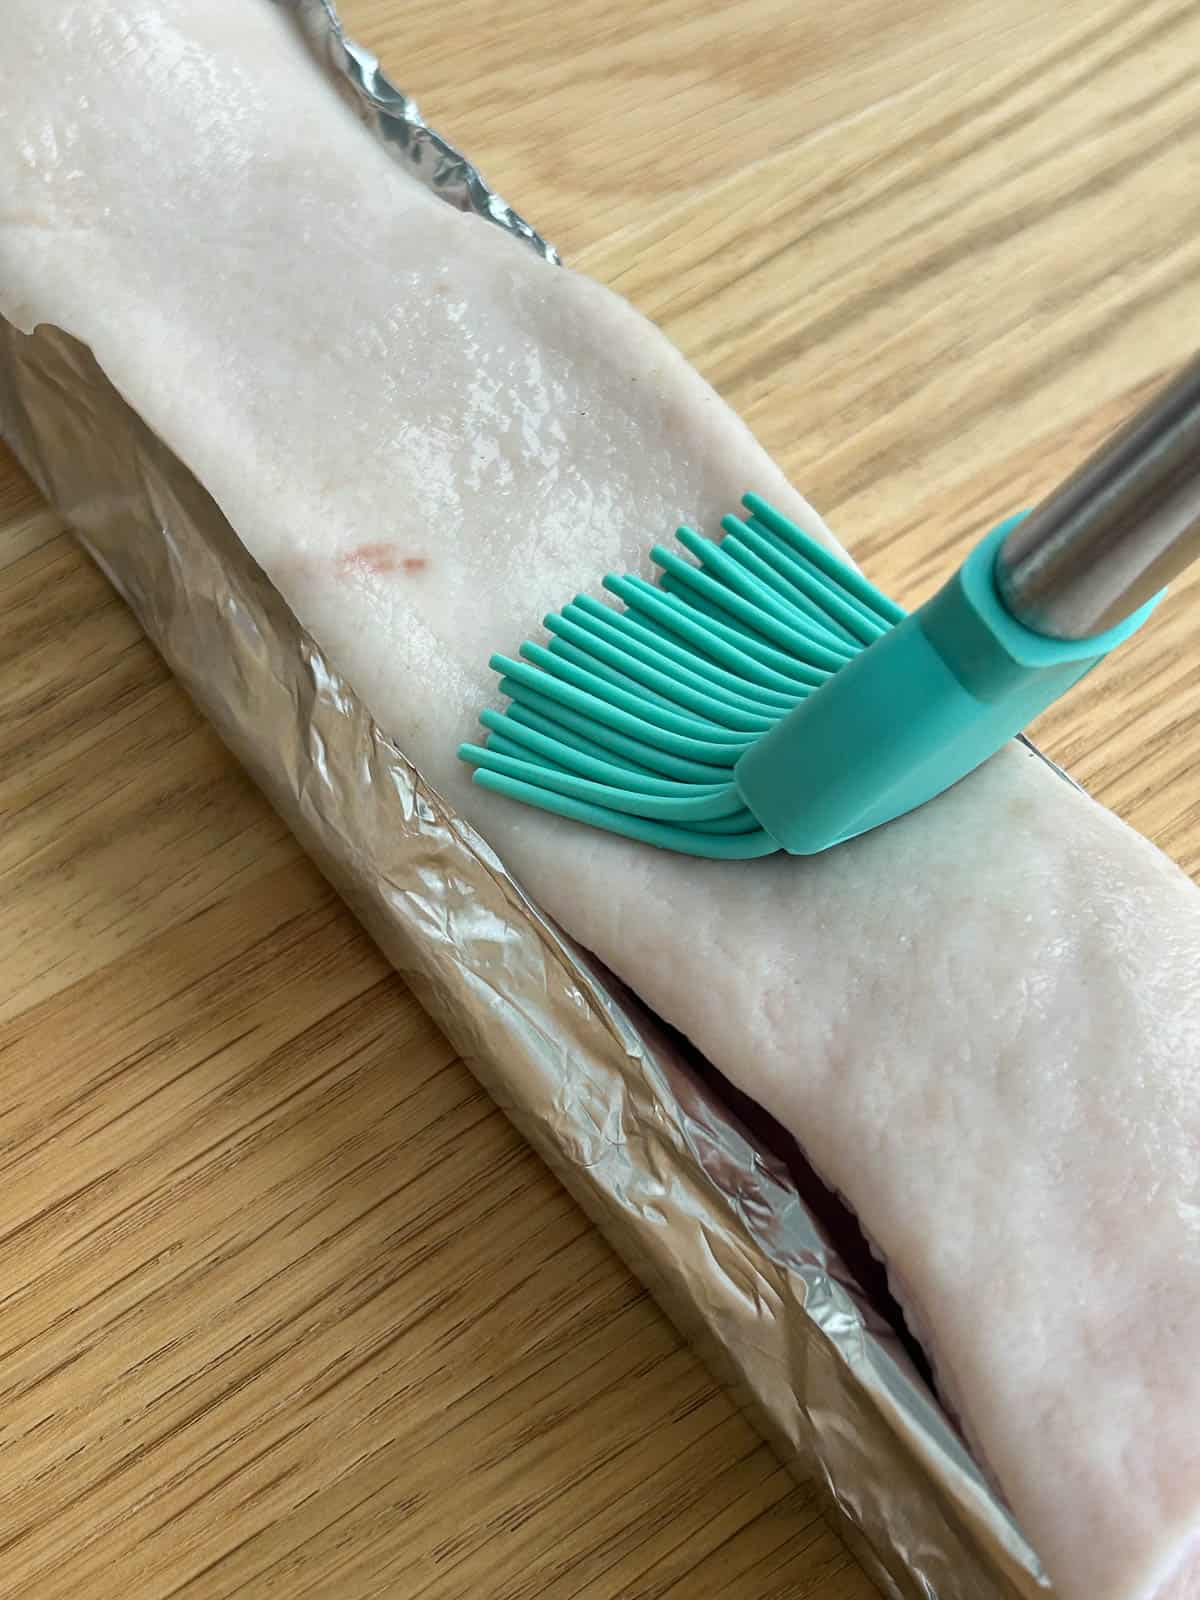
- Step 6: Wrap the pork belly in foil so the meat is fully covered but the skin is facing up and full exposed. Brush the skin with vinegar and allow it to dry for a few seconds.
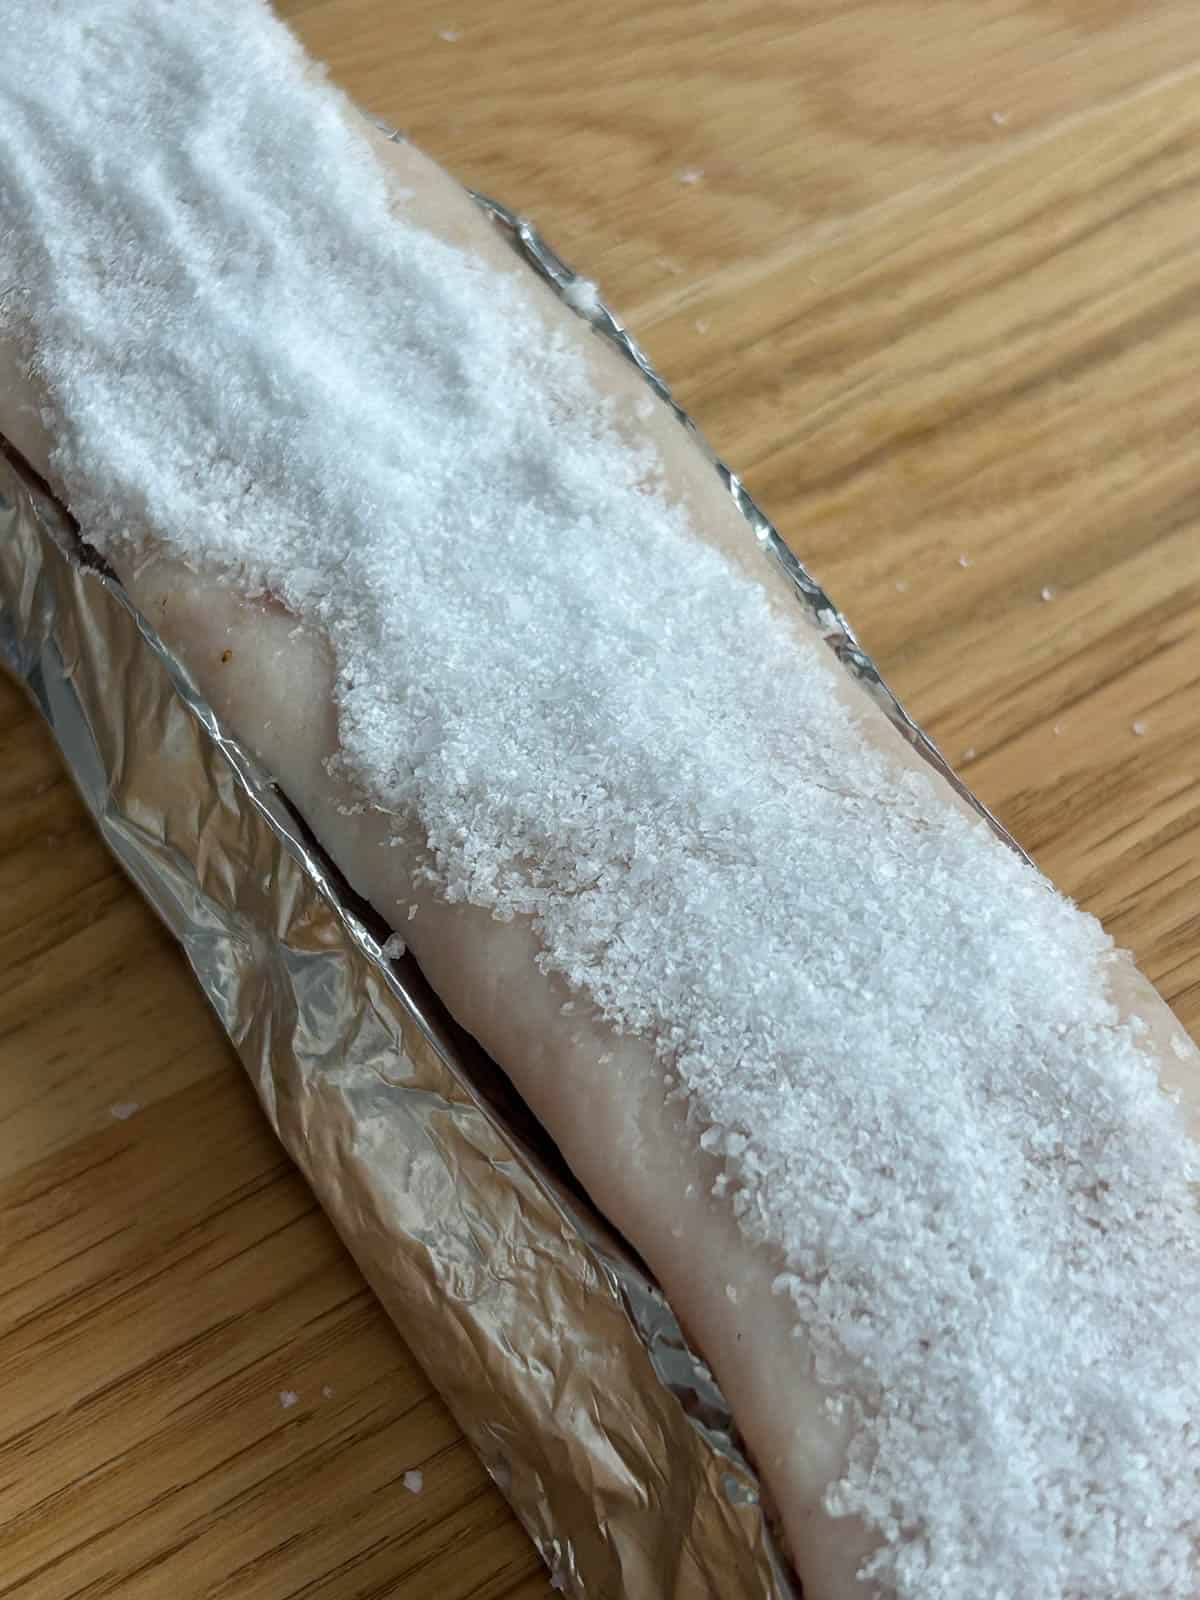
- Step 7: Add the salt over the pork belly skin so it's even and well coated. Press down lightly to pack it.
- Step 8: Air fry at 200F for 10-15 minutes or until the salt crust is completely dry and can be picked up.
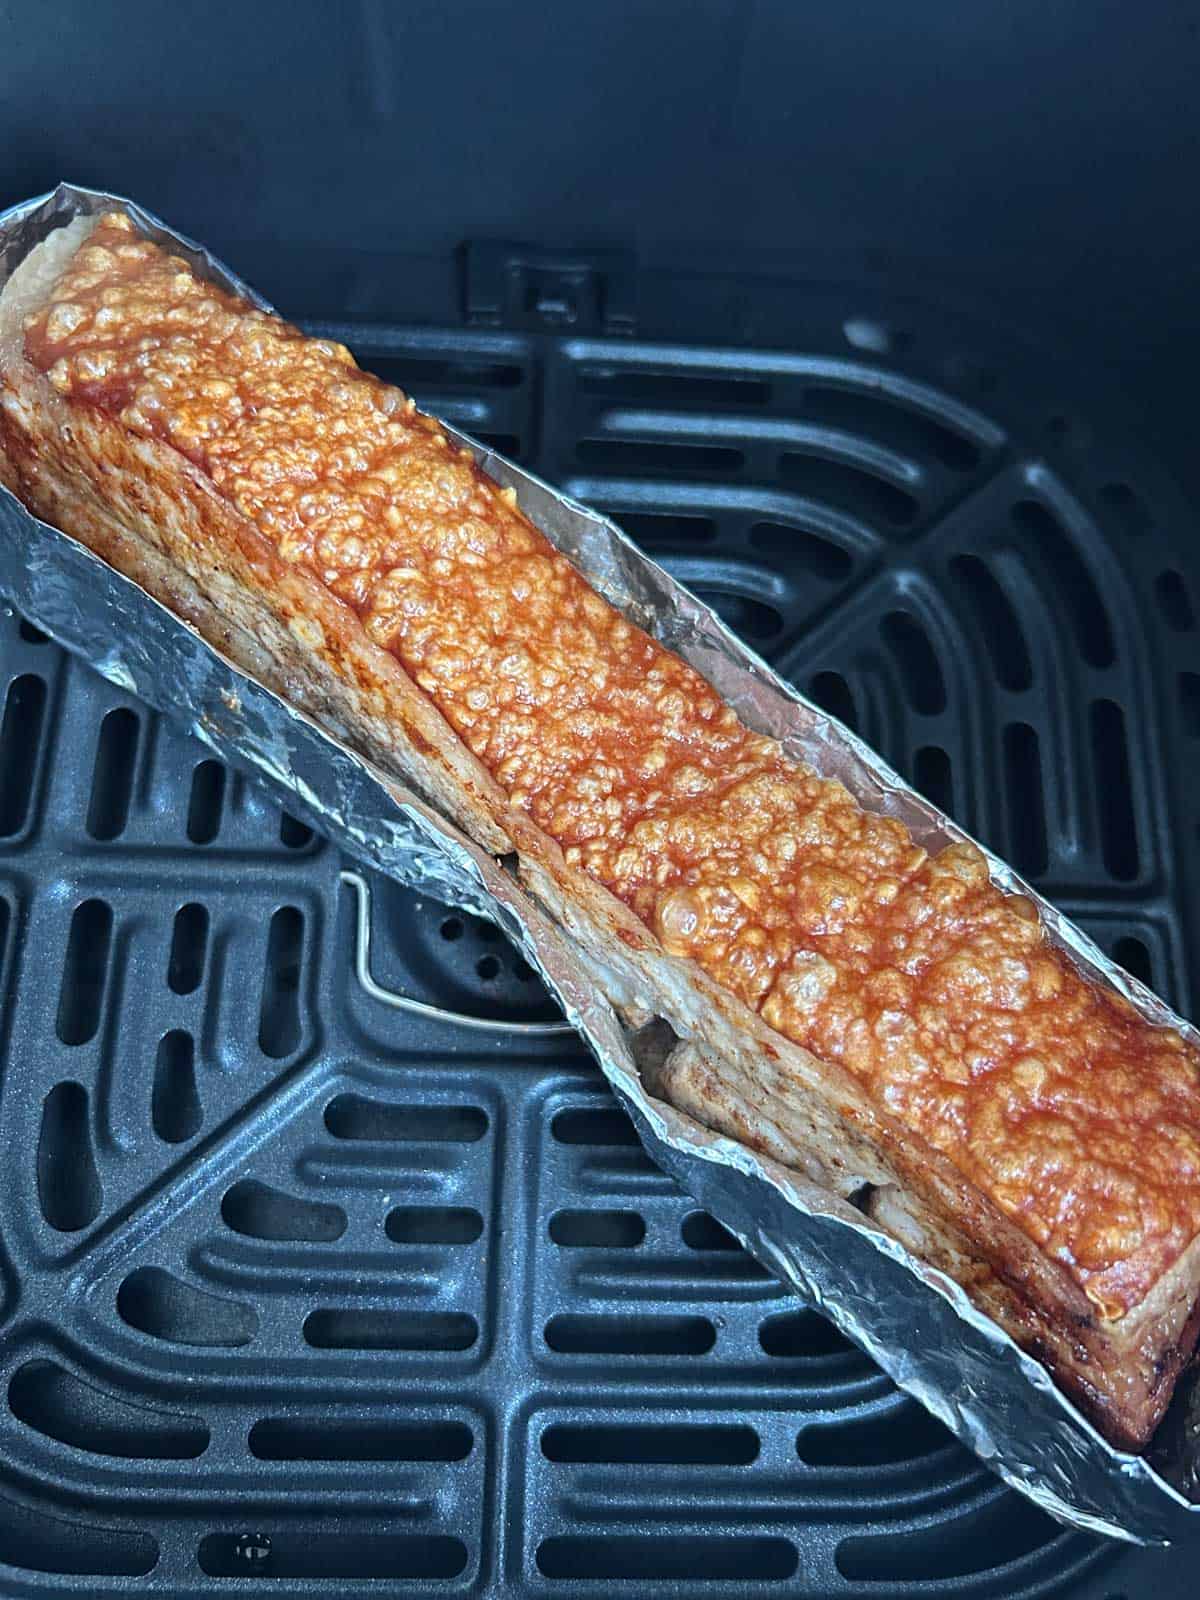
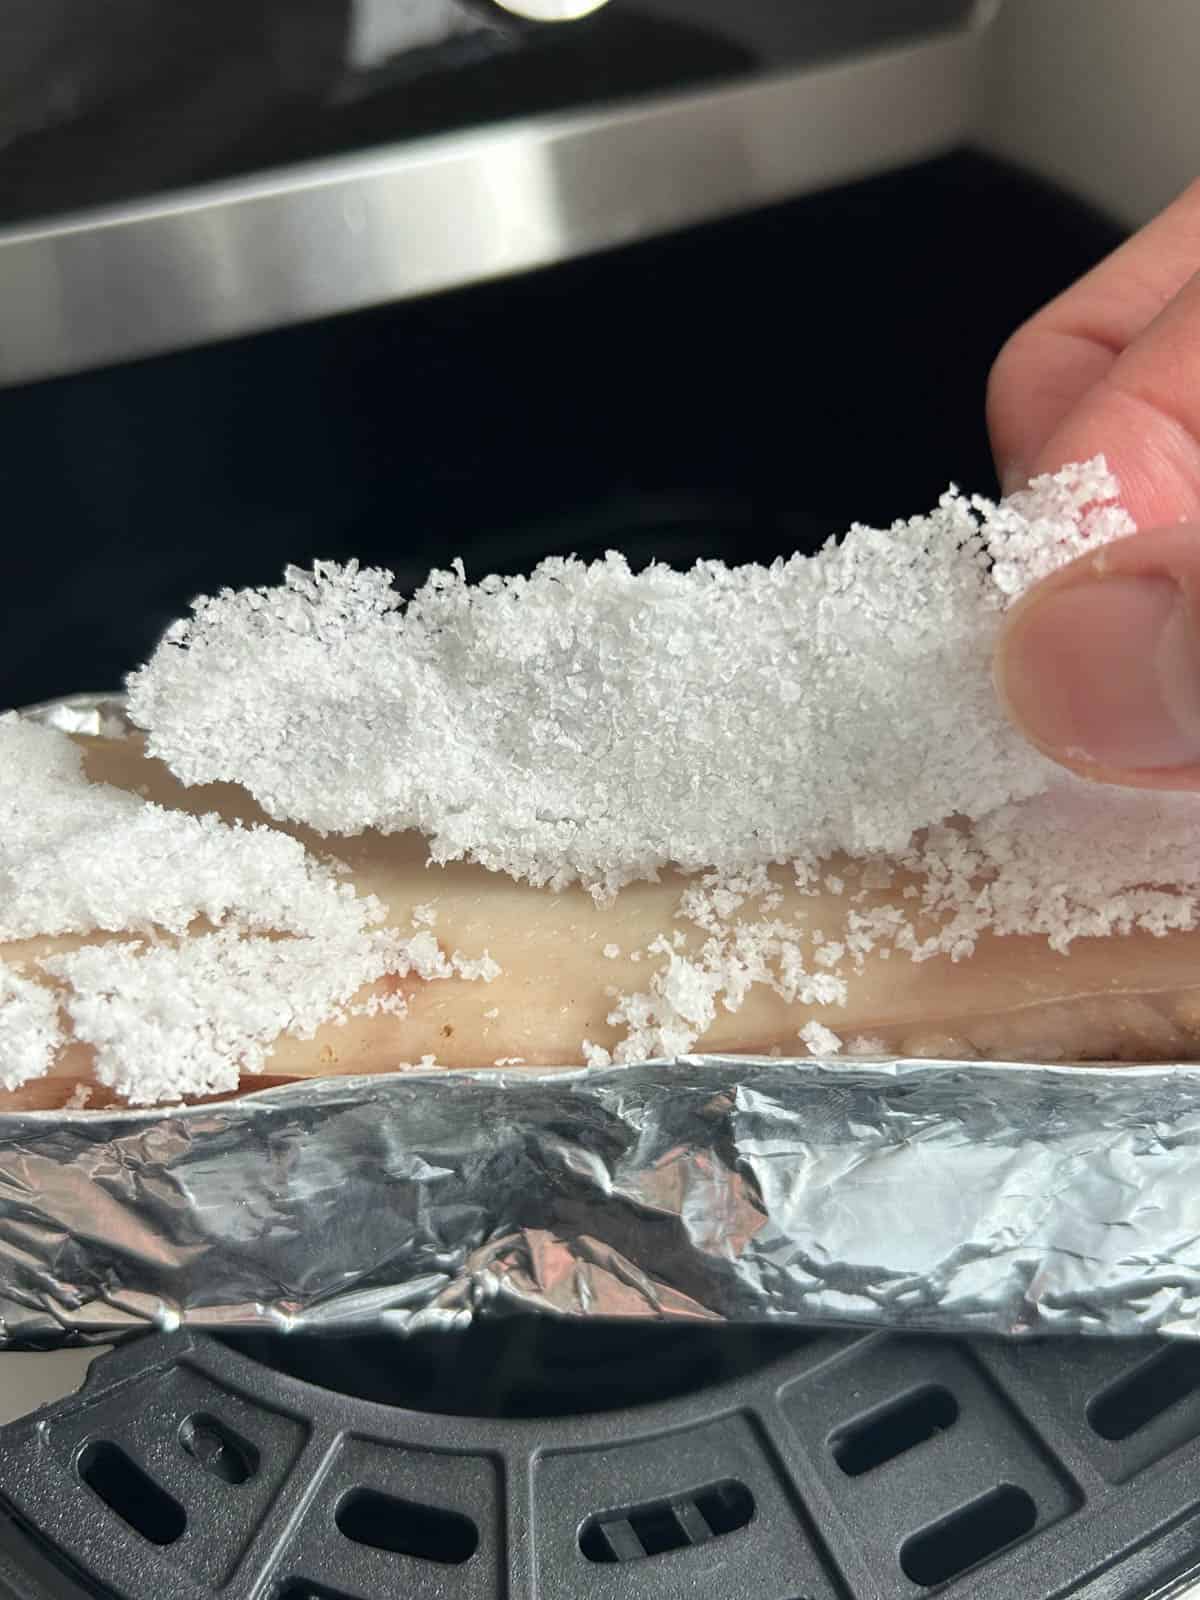
- Step 9: Remove the salt crust and brush off any remaining excess salt with a paper towel. Lightly brush the skin with neutral oil and air fry at 400F for 10-15 minutes until the skin is puffed up and crispy. If there are parts of the skin that is browning faster than others, cover it with foil to keep it from burning.
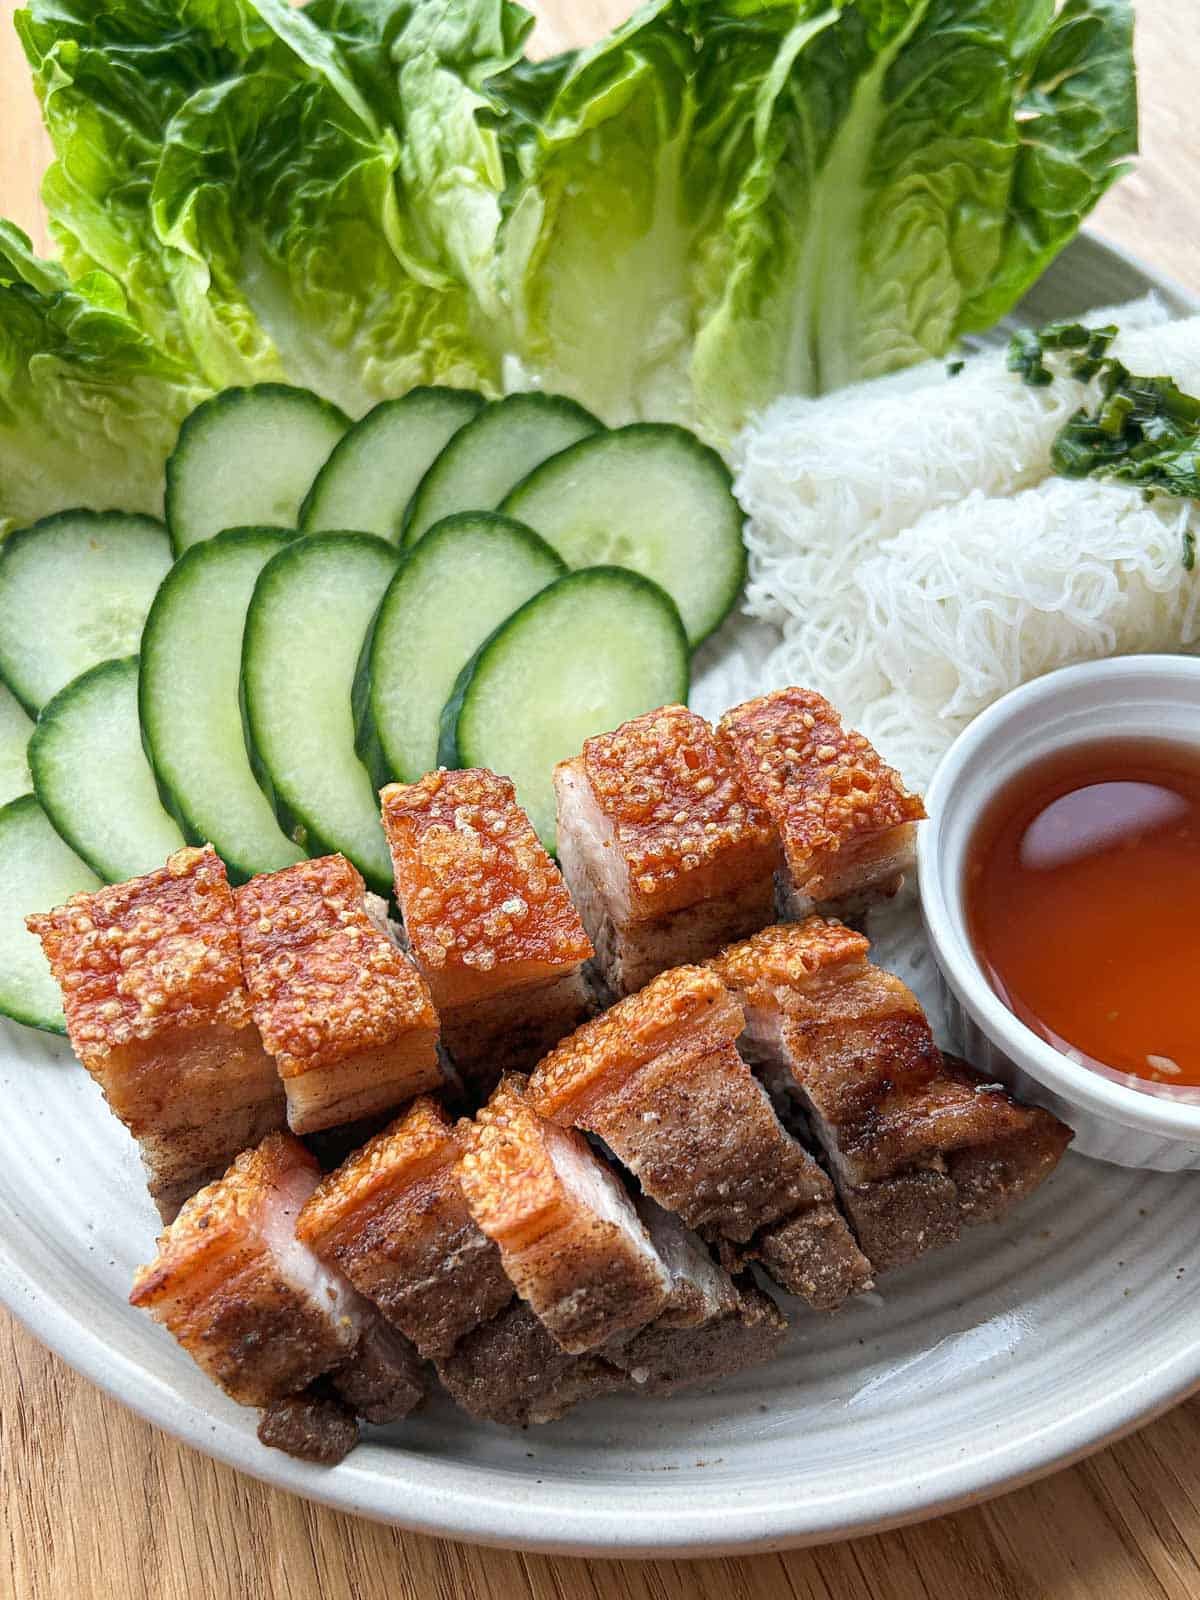
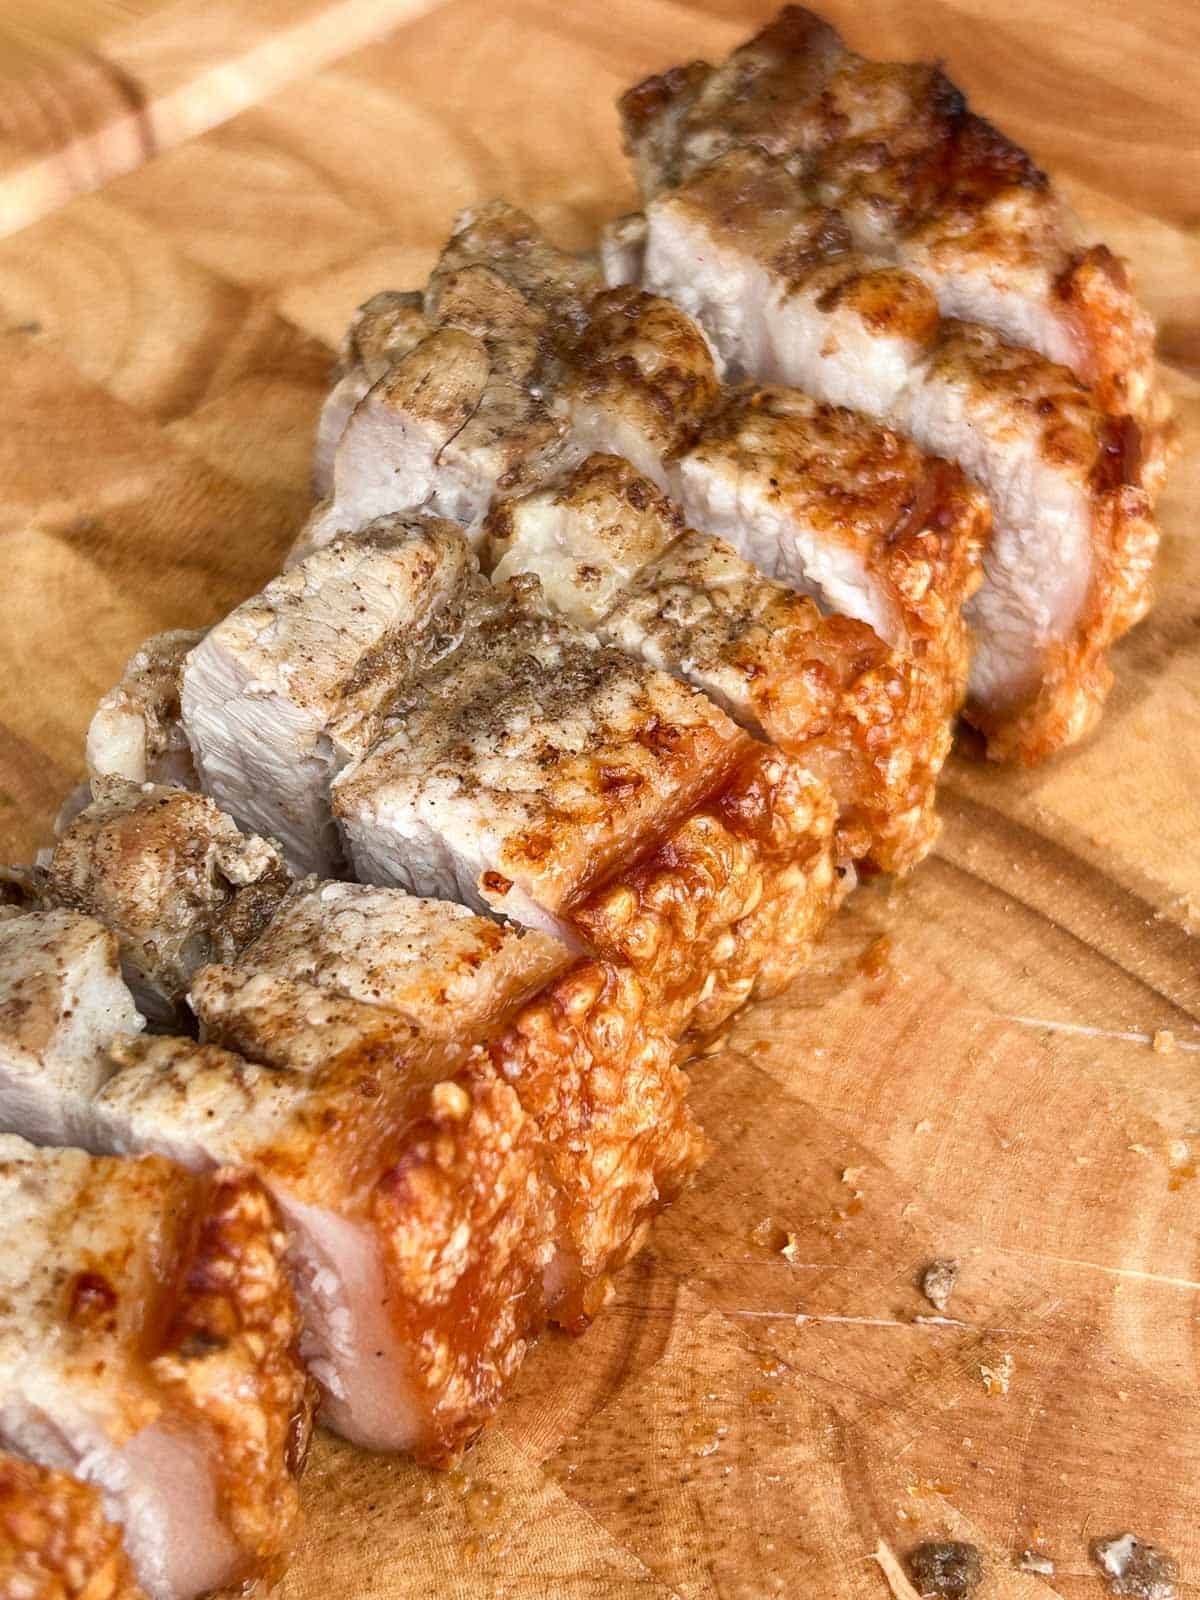
- Step 10: Let is rest for 10 minutes before cutting into slices. Enjoy with banh hoi, fresh herbs and veggies, and nuoc mam cham!
Top Tips for the Best Crispy Pork Belly
- Choose the right cut of pork belly! Grocery stores sell all types of pork belly but you must buy the pork belly with the skin on! This is where the crackly skin comes from. I usually purchase skin on pork belly with the rib and cut off the rib at home to eat separately, since it is the most affordable. However, skin on pork belly with no rib works too!
- When choosing a pork belly cut, be sure to look for one that has a good ratio of fat to meat. Too much fat will cause the dish to feel too heavy. I like getting cuts that are more on the meaty side with a little bit of fat.
- Choose evenly leveled pork belly slabs. Pork belly from the grocery store comes in 1-2 inch wide pieces. I like to purchase skin on pork belly with the rib attached, so I can cut it off horizontally and create a leveled pork belly. Pork belly with the rib removed will usually hold up unevenly, when the meat is standing up. To get an even cook, we want to level out the meat so it has a flat surface. To fix this, you can either cut the meat to even it out, or do what my dad does and add slices of apple underneath to balance it out. Alternatively, you can fold up some extra foil and place it underneath the lower side to prop it up.
- Dry the skin well. This ensures a crispy skin that won't get tough, dry and chewy.
- Prick the skin more than you think you need to! Use multiple toothpicks or a fork to create small punctures in the skin, being careful not to prick deeper than the skin. Pricking holes will allow the fat in the skin to render out and puff up to create that crispy pork skin.
How to store and reheat crispy pork belly
Store crispy pork belly in an air tight container for up to 3 days.
To reheat, add the crispy pork belly to an air fryer and air fry at 400F for a few minutes until warm and crispy.
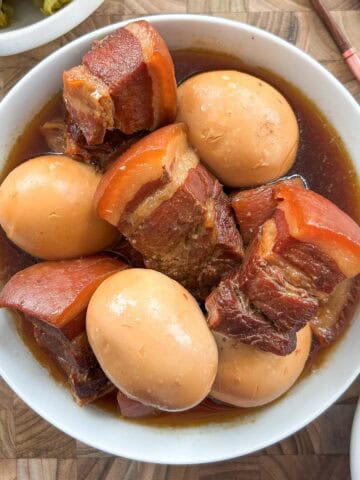
What to serve with crispy pork belly
Crispy pork belly goes great with everything but here are some of my favorite foods to pair it with:
- White jasmine rice
- Vermicelli noodles
- Banh hoi sheets
- Lettuce, cucumbers, and fresh herbs
- Vietnamese fish sauce (nuoc mam cham)
FAQ
While parboiling the pork belly is technically optional, this is a step my dad always does to ensure a clean tasting pork belly. It removes impurities from the pork belly and gives it a better pork flavor, so it's not too porky, in the same way fish can be too fishy when it's not fresh.
Every step in this recipe is a critical step to ensuring the pork belly gets crispy. A few things to double check are: was it brushed with vinegar? Did you air fry it low until the salt crust was dry? Were holes puncture throughout the skin? Did you brush the skin with oil so it can crisp up?
White vinegar is recommended here since it is neutral flavored and won't alter the taste of the pork belly.
This recipe has not been tested for the oven since it would require different temperatures and cooking times. However this oven roasted crispy pork belly would be a good alternative.
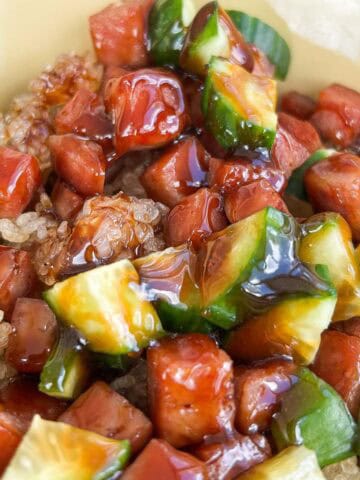
Other recipes to try:

Crispy Pork Belly (Air Fryer Method)
Equipment
Ingredients
- 2 lbs skin-on pork belly
- 1 teaspoon five spice powder
- ½ teaspoon salt
- ½ teaspoon white pepper
- 1 ½ teaspoon Shaoxing wine
- 1 teaspoon white vinegar
- 1 tablespoon salt for the salt crust
- ½ teaspoon neutral oil
Instructions
- Using a sharp knife, cut 1 inch slits halfway into the meat side of the pork belly. This helps the marinade penetrate deeper.
- Parboil the pork belly by adding 1 inch of water to a pot and bringing it to a boil. Add in the pork belly, meat side down, making sure the pork belly skin sits above the water and remains dry. Parboil for 5 minutes to draw out impurities. After 5 minutes, remove the pork belly and pat it dry.
- Mix together five spice powder, ½ teaspoon salt, white pepper, and Shaoxing wine until it forms a paste. It'll be thick and fragrant. Set aside.
- Using a toothpick, fork, or meat tenderizer, prick small punctures into the pork skin, being careful not to puncture deeper than the skin.
- Rub the five spice paste all over the meat side only, working it into the slits.
- Wrap the pork belly in foil so the meat is fully covered but the skin is facing up and fully exposed. Brush the skin with vinegar and allow it to dry for a few seconds.
- Add the salt over the pork belly skin so it's even and well coated. Press down lightly to pack it.
- Air fry at 200F for 10-15 minutes or until the salt crust is completely dry and can be picked up.
- Remove the salt crust and brush off any remaining excess salt with a paper towel. Lightly brush the skin with neutral oil and air fry at 400F for 10-15 minutes until the skin is puffed up and crispy. If there are parts of the skin that is browning faster than others, cover it with foil to keep it from burning.
- Let it rest for 10 minutes before cutting into slices. Enjoy with banh hoi, fresh herbs and veggies, and nuoc mam cham!
Video
Notes
- Choose the right cut of pork belly! Grocery stores sell all types of pork belly but you must buy the pork belly with the skin on! This is where the crackly skin comes from. I usually purchase skin on pork belly with the rib and cut off the rib at home to eat separately, since it is the most affordable. However, skin on pork belly with no rib works too!
- When choosing a pork belly cut, be sure to look for one that has a good ratio of fat to meat. Too much fat will cause the dish to feel too heavy. I like getting cuts that are more on the meaty side with a little bit of fat.
- Choose evenly leveled pork belly slabs. Pork belly from the grocery store comes in 1-2 inch wide pieces. I like to purchase skin on pork belly with the rib attached, so I can cut it off horizontally and create a leveled pork belly. Pork belly with the rib removed will usually hold up unevenly, when the meat is standing up. To get an even cook, we want to level out the meat so it has a flat surface. To fix this, you can either cut the meat so even it out, or do what my dad does and add slices of apple underneath to balance it out. Alternatively, you can fold up some extra foil and place it underneath the lower side to prop it up.
- Dry the skin well. This ensures a crispy skin that won't get tough, dry and chewy.
- Prick the skin more than you think you need to! Use multiple toothpicks or a fork to create small punctures in the skin, being careful not to prick deeper than the skin. Pricking holes will allow the fat in the skin to render out and puff up to create that crispy pork skin.

Leave a Reply